What’s new in Filter Creator: rebuilt V6 Image-to-Filter, automatic segmentation, and new creative tools
- phantaisia
- May 12
- 4 min read
We’ve updated the Filter Creator to make custom AI filter creation faster, clearer, and easier to control.
This release focuses on three key areas:
A major rework of V6 Image-to-Filter
Automatic segmentation for Image-to-Filter workflows
A clearer creation structure across Text-to-Filter and Image-to-Filter
We’ve also added Angle Creator to the Conceptualizer to help create stronger visual variations before turning them into filters.
V6 Image-to-Filter, rebuilt from the ground up
We completely reworked V6 Image-to-Filter to make it easier to use and more reliable in production.
The new flow removes most of the complexity from the previous version. You no longer need to learn a special prompting structure. Start with a strong base image, select the person with the new segmentation tool, and generate a working filter.
To update an existing V6 Image-to-Filter, open the filter, click Edit, and then click Create again. The filter will automatically be updated to the new V6 Image-to-Filter mode.
V6 Image-to-Filter now supports three creation modes.
1. Recommended mode: skin-only adaptation
This is the recommended way to use V6 Image-to-Filter.
In this mode, V6 adapts the visible skin and identity-relevant areas while keeping the original body, outfit, and scene stable. This gives the most reliable results when the base image already looks close to the final filter.
For best results, use differentiated male and female base images. These base images should already include the right outfit, body type, pose, and scenery. You can create them directly in the Conceptualizer with Gender Swapper.
Best for: high-quality filters where the outfit and scene are already correct.

2. Custom clothing with prompt
You can also change the clothing of the person in the base image with a prompt.
In this mode, V6 uses full-body inpainting to adapt the outfit based on your text instruction. This is useful when the final filter should include specific clothing, uniforms, costumes, or branded looks.
Best for: quick clothing changes without preparing a dedicated reference image.

3. Custom clothing with image reference
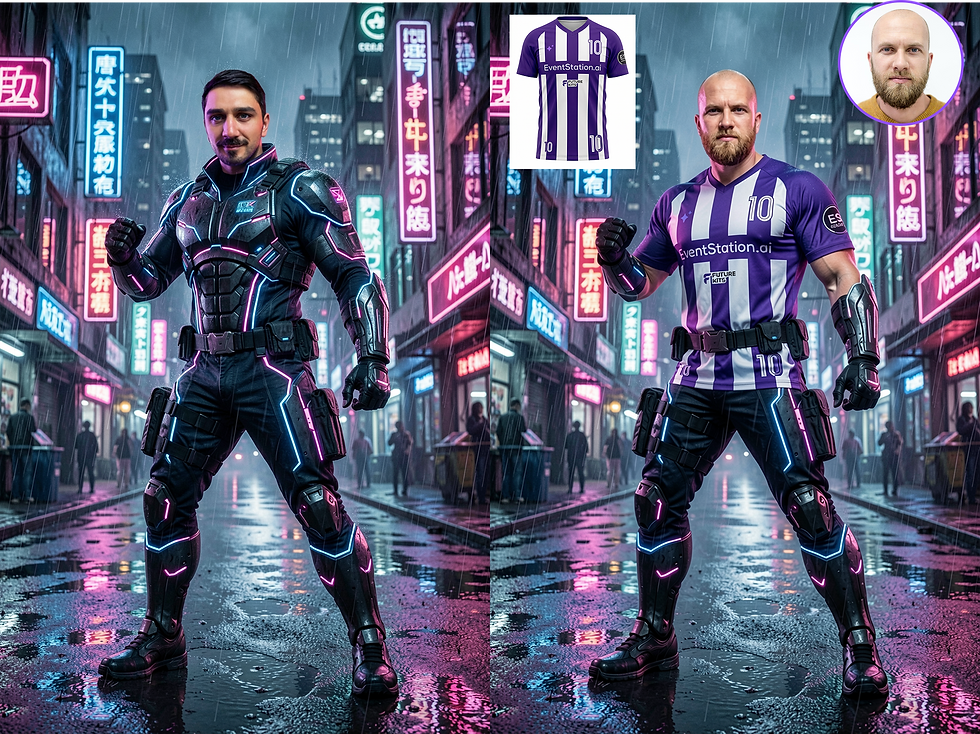
For more specific clothing requirements, you can upload a reference image, such as a jersey, branded shirt, or uniform.
The model then uses the uploaded reference as guidance for the clothing generation. This gives you more control than text-only clothing prompts, especially when the clothing has a recognizable design.
Best for: branded outfits, jerseys, uniforms, or client-specific clothing.
For the highest-quality results, we still recommend creating base images where important clothing elements are already integrated whenever possible. The custom clothing modes are designed for cases where you need more flexibility or want to adapt clothing without rebuilding the full base image.
Automatic segmentation for Image-to-Filter
Image-to-Filter now includes automatic segmentation.
Instead of manually drawing a mask, upload an image, select the person you want to use, and the system creates the mask automatically. This works across Image-to-Filter models, including V5 and V6.
The result is a faster setup process with more consistent masks, especially when preparing filters for production or testing across multiple images.

A clearer way to create filters
We’ve also reorganized the Create Filter experience into two main creation modes.
Text-to-Filter is now the place for filters created from text only. It includes both single-person filters, such as FaceSwap, and group filters, such as MultiSwap, with direct access to the available model versions like V5 and V6.
Image-to-Filter now has its own dedicated flow. This makes it clearer when you are creating a filter from an uploaded or generated base image instead of starting from text alone.
The goal is simple: choose whether to start from a prompt or an image, then select the model and setup that fits the use case.

New in the Conceptualizer: Angle Creator
We’ve added Angle Creator to the Conceptualizer.
Upload an existing scenery or concept image, describe the angles you want, and Angle Creator generates a 3×3 grid of alternative perspectives. The best results can then be extracted and used as standalone images or as starting points for filters.
This is useful when adapting a client draft, exploring visual variations, or preparing multiple perspectives of the same concept.

How Angle Creator works
1. Upload your image
Open Angle Creator in the Conceptualizer and upload the scenery or concept image you want to work with.

2. Describe the angle
Write a short prompt describing the kind of angle or perspective you want to see.
Example: “Upper Body Angles”
3. Generate angle variations
Angle Creator creates a 3×3 grid with different results based on your image and prompt.

4. Extract and use your images
Select the best results from the grid, extract them, and use or download the images for your next workflow.

Angle Creator is especially helpful when you need more visual flexibility from an existing concept, such as a slightly different camera angle, a stronger perspective, or additional images that still feel connected to the original scene.
Preparing for video workflows
The Filter Creator is designed to help teams create, test, manage, and deploy AI filters directly inside the EventStation workflow.
With this update, the creation process becomes more structured and more accessible, especially for teams building filters for branded events, client concepts, and production-ready photo booth activations.


Comments